Packing 101: How to Pack for a Weekend Backpacking Trip
By David Hallen
The air is fresh, conditions look pristine, and the mountains are calling. After much consideration, you’ve decided to take the step between day-hikes and backpacking and attempt your first overnight trip into the wilderness. However, one question still remains: How does one pack for a night outside?
Throughout this short guide, we’ll introduce you to our base packing list for a standard weekend trip. Note that this list is not exhaustive. Depending on the time of year or terrain, it might be wise to make some changes to this list. I’ve noted some of those changes in the “explainers” that accompany each list section, but make sure to think through your route and make further changes accordingly.
Part 1: Base gear and packing your pack
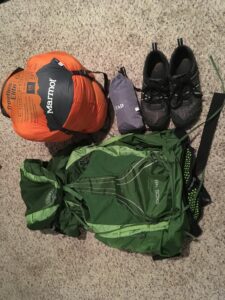
- A solid pack
- A rain-cover for your pack
- Trail shoes or boots
- A good sleeping bag.
- Generally, you’ll want a sleeping bag rated for around 20 degrees F below the “cold point” of your trip. I personally use two sleeping bags: one rated for 35-45 degree in the Summer months and one rated for 0 degrees in Winter.
- When choosing a sleeping bag (or a “puffy” jacket), you’ll be faced with the decision of purchasing a down or synthetic bag. Each of these options have their own positives. Down bags are far more compressible and tend to NOT increase in temperature rating as much over the years (meaning that a 0 degree down bag won’t become a 20 degree bag nearly as quickly). However, down tends to be far more expensive and lose warming-ability when wet. Make sure to keep your down bag in a trashbag or other waterproof container inside your pack. Synthetic bags tend to be cheaper and keep you warm even if they get a little wet, but can lose warmth over time and are considerably more bulky than their down equivalents. To help your synthetic bag keep its warmth, store it in a non-compressed state as much as possible.
- Trekking Poles
- Depending on your personal preferences and terrain, it may be smart to also invest in a pair of trekking poles. Trekking poles are especially helpful in hill-y or technical terrain. I generally use trekking poles on any long or multi-day trip.
When packing your pack, always start out by placing the sleeping bag at the bottom. Your sleeping bag will likely take up the most room and is fairly compressible, so placing items on top of it will generally lead to the most efficient use of pack space. Place heavier items, such as your tent and bear-canister, in the middle and as close to your back as possible. Finally, place lighter, assorted gear around the top and outside of your backpack.
Part 2: Your sleep set-up
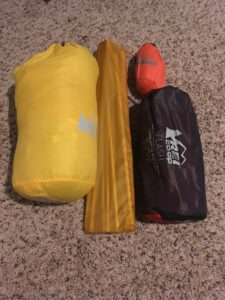
- A tent
- Within this setup, you’ll have the base tent, a ground-tarp, stakes, and tent poles. Some tents can be set up without using the base tent, but instead using just the ground-tarp, poles, and rain fly! This serves as a lighter-weight alternative for summer backpacking.
- When choosing a tent, you’ll have two main options: freestanding and non-freestanding. Freestanding tents can be set-up without the use of a trekking pole. Non-freestanding tents require a trekking pole for set-up. Freestanding tents tend to be more user-friendly (though this may just be a case of people being more used to them), have more internal volume due to internal poles providing structure, be easier to pitch on rocky terrain due to stakes not being essential for structure, have less issue with condensation due to their double-wall nature, and regulate temperature better due to ability to sleep with the rainfly on or off. Non-freestanding tents, on the other hand, tend to be lighter, faster to pitch due to not having to clip tent poles, more wind-resistant, don’t get as wet on the inside when pitching in the rain (due to single-wall material), and are often cheaper.
- Sleeping pad
- When choosing a sleeping pad, make sure to look at this listed “R-value”. This rating gives you a guide of how warm the sleeping pad will be (the degree of insulation between you and the ground). Generally, an R-value of 0-2 will be fine in the Summer, 2-4 will keep you comfortable in all but the coldest months, and 5+ is the way to go on those frigid winter nights. Using a high R-value sleeping pad in the summer months generally won’t lead to overheating, so feel free to use just one higher-value pad throughout.
- A small, inflatable pillow
Part 3: Drybag Items: Electronics and health-products
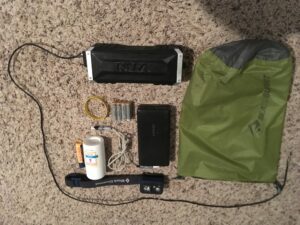
- A trusty dry-bag
- Use a drybag to keep your most precious (or non-water resistant) items safe.
- Headlamp
- Don’t forget to bring extra batteries if your headlamp is battery-powered!
- Portable charger for your phone
- Charging cable
- Health-Products
- Generally, it’s a good idea to bring chapstick and some form of moisturizer on trips (especially winter trips where dryness can be an issue). Pack any necessary medical products (prescription drugs, contact lenses, etc) into your dry bag as well.
- Don’t forget sunscreen! Sunscreen is essential for avoiding skin damage.
- (Optional) Speaker or headphones
- While music can be a fun part of any trip, make sure not to play music out loud near other backpackers (without their permission). After all, not everyone has the same music taste or desire to listen to music on their hike!
Part 4: Food and water
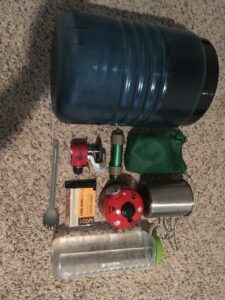
- Bear canister or bag
- While both of these options are viable means of protecting your food from bears and rodents (and therefore protecting those bears from becoming used to human food), each has its own advantages and disadvantages. Bear canisters are quicker to place, don’t require a well-positioned branch, and are more user-friendly for inexperienced backpackers. There has not been a recorded incident of a bear getting into a bear canister and some parks require their usage. Bear bags are lighter, less bulky, and significantly cheaper.
- When placing a bear canister, make sure that it’s at least 100ft from your camp.
- When hanging a bear bag, make sure that it’s at least 10-15 feet in the air and a decent distance from the tree trunk and any branch.
- Water Filter
- In the winter months, store your water filter in your sleeping bag overnight. Freezing temperatures can make a water filter ineffective.
- Water filters can be used with pumps, pouches, and Smart Water brand water bottles. Experiment and figure out which works best for you!
- Camp stove
- Matches or a filled lighter
- Propane
- Cooking dish (make sure your camp stove can safely hold it ahead of time!)
- Spork or other utensils
- Water bottles
- Lack of water is a frequent issue amongst backpackers. Make sure you have enough water and know where you can refill!
Part 5: Clothing

- Base layer
- Depending on the length of the trip and expected conditions, bring 1-2 extra pairs of socks and 0-1 extra pairs of underwear.
- A t-shirt, tank top, sports bra, or long-sleeve can serve as a base layer. Tighter fitting fabrics tend to wick sweat better.
- In cold conditions, consider bringing an extra pair of leggings to serve as an extra layer for your legs.
- Do NOT use cotton clothing, especially in the winter. Due to its slow drying speed and inability to retain heat when wet, cotton can be dangerous to backpackers.
- Mid layer
- For the upper body, consider a light sweater, flannel, or windbreaker for the mid layer in colder seasons.
- For the lower body, mid layer is very season-dependent. In colder temperatures, consider a solid layer of outdoors pants, warm leggings, or athletic pants. In warmer temperatures, consider swim trunks, athletic shorts, or a lighter pair of leggings.
- Jacket
- A light, waterproof jacket can be a godsend when temperatures drop or the sky opens up. Consider packing a waterproof jacket no matter the season. In the summer, it can come in handy for rainy days. In the winter, a waterproof jacket can be thrown over solid mid and base layers to provide warmth without overheating.
- “Puffy” Jacket
- “Puffy” jackets are a beneficial tool in the dead of winter. Though generally not hiked in except for on the coldest days, they can be a great tool for stops or overnight garb.
- As with sleeping bags, one has the choice to wear down or synthetic material. Down is lighter weight and more compact, but also tends to be more expensive and doesn’t keep warmth in wet conditions as well as its synthetic equivalent.
In Summary, I tend to advise the following lists for packing for a weekend trip (list includes worn clothing):
- Warm: 2 pairs of socks, 1 pair of underwear, swimsuit trunks, tanktop and/or sports bra, light flannel or similar, hat (for sun), and rain jacket. In especially wet conditions, I might add a second set of underwear, an extra base later, and dry shorts to sleep in.
- Mid-temperature: 2 pairs of socks, 1 pair of underwear, outdoor pants, tanktop and/or sports bra, sweater or flannel, and outer jacket and/or rain jacket. In especially wet conditions, I might add a second set of underwear, an extra base layer, and dry shorts or athletic pants to sleep in.
- Cold: 2 pairs of socks (warm), 1 pair of underwear, outdoors pants, base layer with sleeves depending on temperature, sports bra if needed, sweater or flannel, outer jacket, rain jacket, and “puffy” jacket. Depending on the temperature and preference, add: waterproof gloves, gaiter/balaclava, beanie, wind/rain pants, and long underwear or extra leggings for under-pants wear. In especially wet conditions, I might add a second set of underwear, an extra base layer, and athletic pants to sleep in (or use as a backup pair if the original pants get soaked).
Part 6: Assorted Items
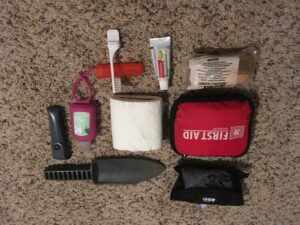
- Sanitary kit
- You’ll have to dig a cathole to use the restroom in the woods. Bring along a trowel, toilet paper (some choose to bring a roll, others bring part of a roll), and hand sanitizer.
- Knife
- First Aid Kit
- The extent to which you choose to pack your first aid kit is a personal decision, but don’t forget anti-bacterial wipes, band-aids (and/or tape), and tweezers.
- A small, synthetic towel
- Toothbrush and toothpaste
- Remember to store these in your bear canister or bag!
- Emergency blanket
- Ever since a particularly difficult river crossing in winter, I’ve taken to carrying a small emergency blanket year-around. It weighs almost nothing and can save your life when the going gets rough and bad events snowball. Remember, you can get hypothermia at 55 degrees!


